Deploy Custom Inventory Resources
Log Analytics is a tool in the Azure portal to edit and run log queries. We leverage Log Analytics as an inexpensive storage medium for storing custom inventory data collected from Windows and macOS devices. This data is then synchronized to Power BI to be used in BI for Intune.
Custom inventory data is sent to Log Analytics using the Azure Monitor Logs Ingestion API. This requires deploying a set of Azure resources (Data Collection Endpoint, Data Collection Rule, and custom tables) which can be automated using our ARM template.
Already have a Log Analytics workspace?
If you previously set up WUfB Reports and already have a Log Analytics workspace, select Use an existing workspace in Step 1 below and point it to that workspace. Custom inventory and WUfB Reports must share the same workspace.
Prerequisites:
- You must have already created the Inventory App Registration and recorded the Enterprise App Object ID.
- The user deploying the ARM template requires Owner or Contributor + User Access Administrator on the target Azure subscription or resource group.
Step 1: Deploy Azure Resources
- Navigate to the Enhanced Inventory Deploy repository on GitHub.
- Select the Deploy to Azure button.
- Select your target Subscription and Resource group.
- Choose whether to create a new Log Analytics workspace or use an existing one.
- When prompted for Enterprise App Object Id, paste the Object ID from the Create Inventory App Registration guide.
- Select Review + create and then Create.
Tip
If you leave the Enterprise App Object Id field blank, the deployment will still succeed but you will need to manually assign the Monitoring Metrics Publisher role to your inventory app registration on the Data Collection Rule after deployment.
The deployment creates the following resources:
- Log Analytics Workspace (new or uses existing)
- Custom tables:
PowerStacksDeviceInventory_CL,PowerStacksAppInventory_CL,PowerStacksDriverInventory_CL - Data Collection Endpoint (DCE)
- Data Collection Rule (DCR)
- RBAC role assignment (if Enterprise App Object Id was provided)
Step 2: Record Deployment Outputs
- After the deployment completes, navigate to your Resource group.
- Select Deployments from the left menu.
- Select the completed deployment.
- Select the Outputs tab.
- Record the following values for later use:
- DceURI — the Data Collection Endpoint URI
- DcrImmutableId — the immutable ID of the Data Collection Rule
Step 3: Assign Log Analytics Reader to the Power BI App Registration
In this step you assign the Log Analytics Reader role to your Power BI app registration so that Power BI can read the custom inventory data from the workspace.
- In the Azure portal search for, and select, Log Analytics workspaces.
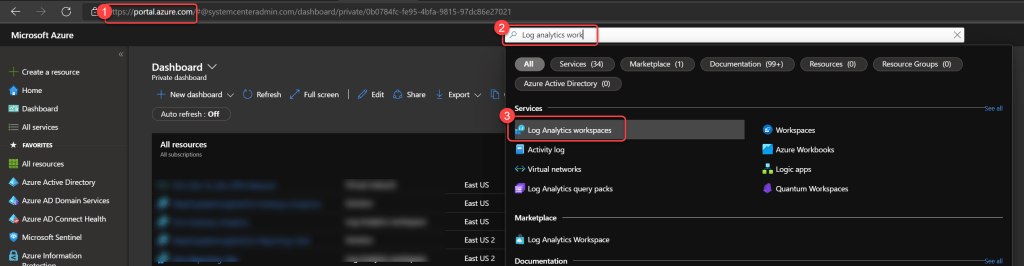
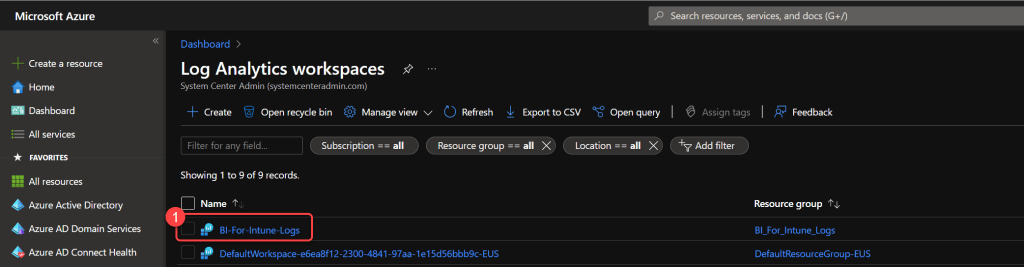
- Select the Log Analytics workspace where you deployed the custom inventory resources.
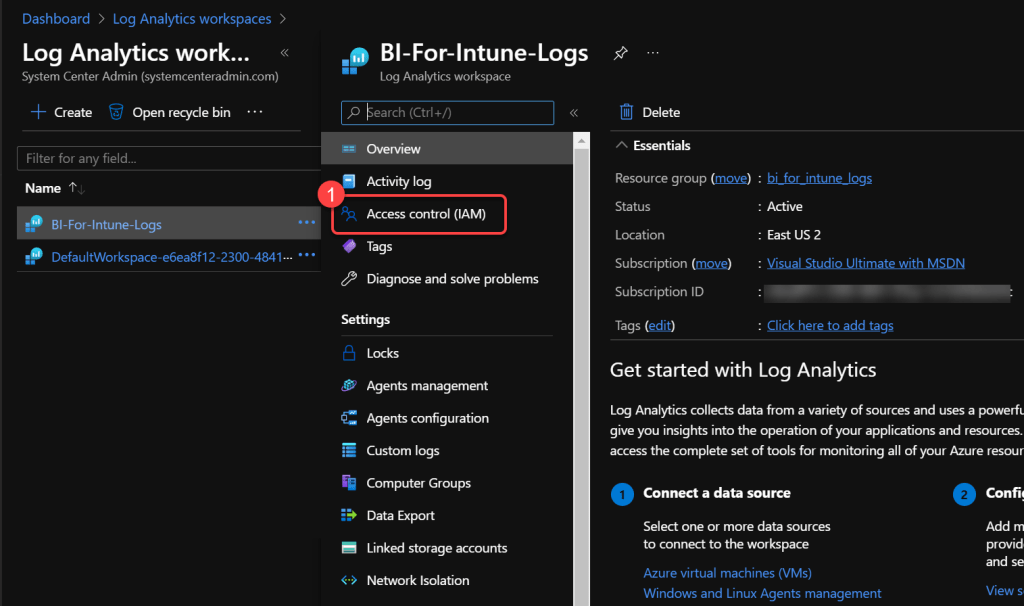
- Select Access control (IAM).
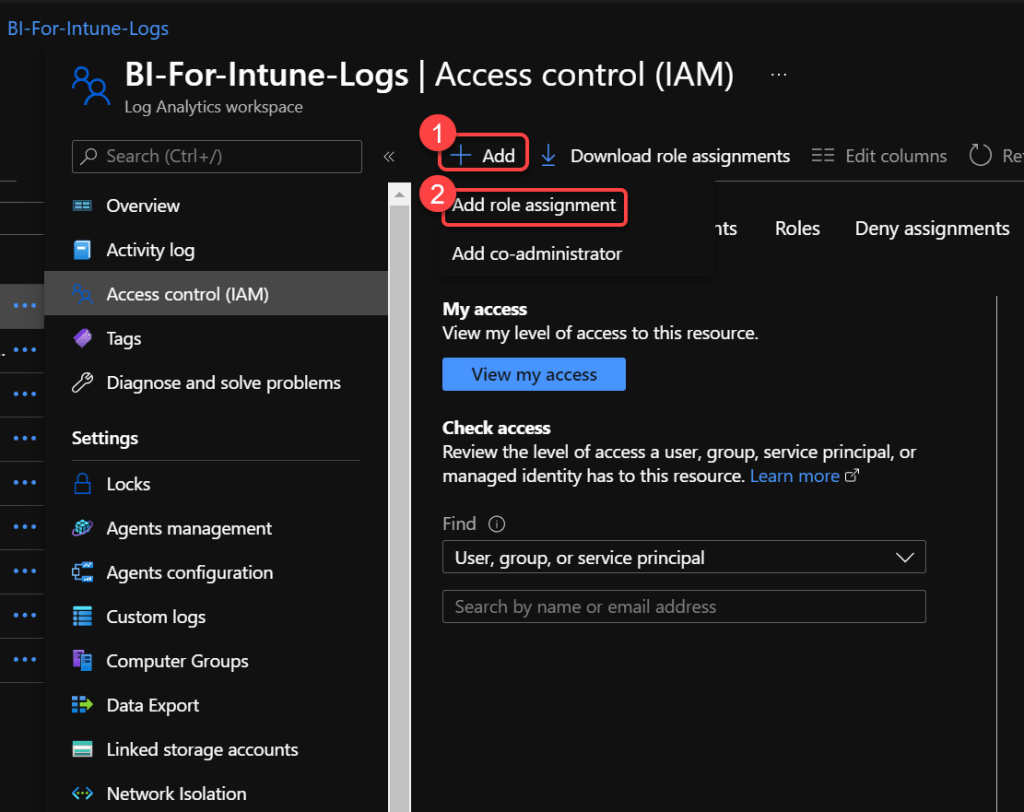
- Select Add > Add role assignment.
- Search for and select Log Analytics Reader, then select Next.
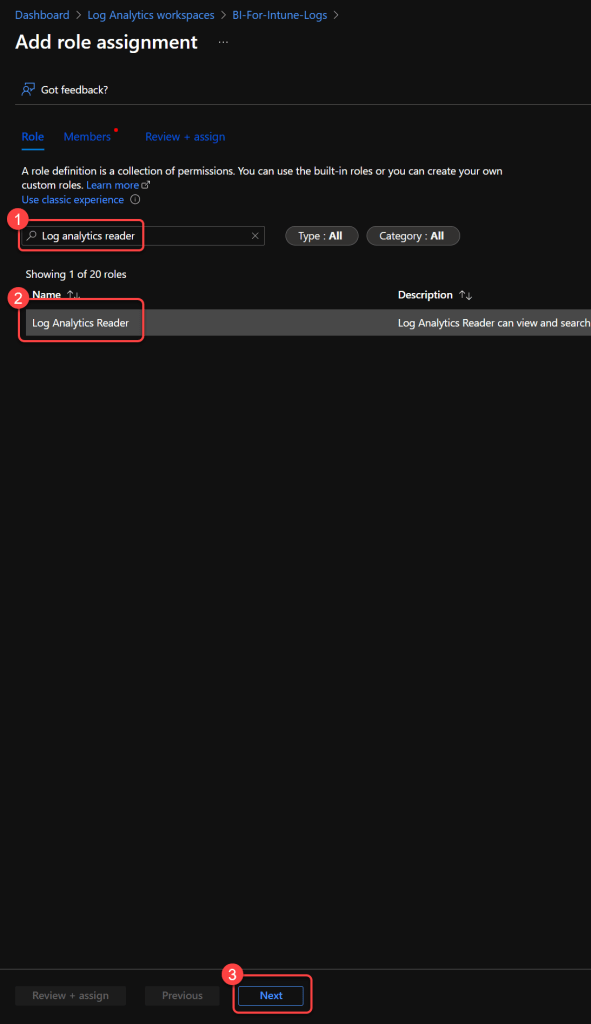
- Select Assign access to: User, group, or service principal.
- Select +Select Members.
- Search for and select the name of the Power BI App Registration (the one created when you installed BI for Intune — not the inventory app registration).
- Select Next, then Review and assign.
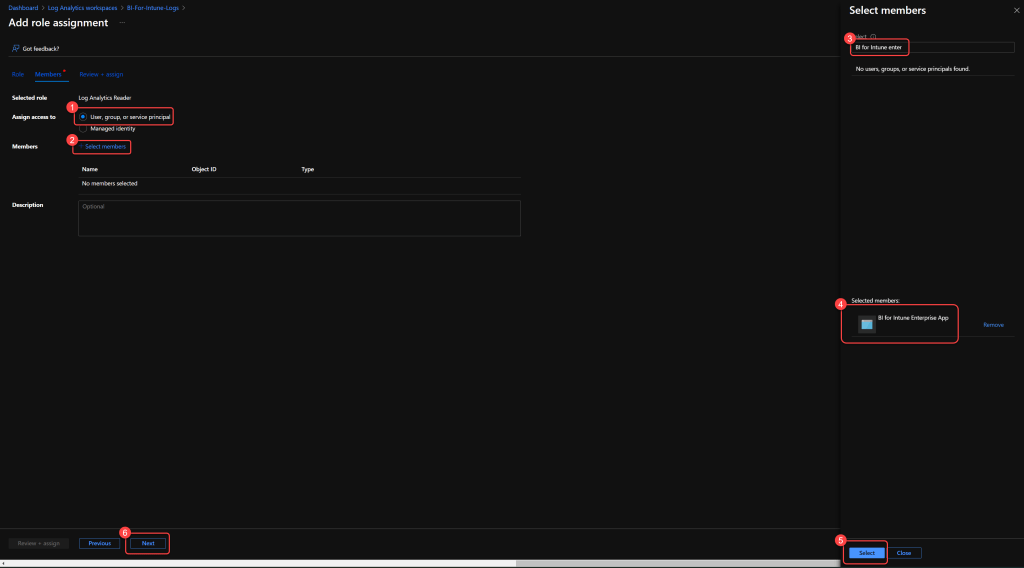
Step 4: Record the Workspace ID
- Open the Log Analytics workspace in the Azure portal.
- On the Overview page (or Properties), locate and record the Workspace ID.
- This value is needed for the Dataset Settings for Log Analytics.
Note
The Workspace Primary Key is no longer needed. The inventory scripts now authenticate using the Logs Ingestion API with the app registration credentials from the Create Inventory App Registration guide.
Summary
You should now have the following values recorded:
| Value | Source | Used In |
|---|---|---|
| Tenant ID | Inventory App Registration | Windows / macOS inventory scripts |
| Client ID | Inventory App Registration | Windows / macOS inventory scripts |
| Client Secret | Inventory App Registration | Windows / macOS inventory scripts |
| DceURI | Step 2 — Deployment Outputs | Windows / macOS inventory scripts |
| DcrImmutableId | Step 2 — Deployment Outputs | Windows / macOS inventory scripts |
| Workspace ID | Step 4 — Log Analytics Workspace | Dataset Settings for Log Analytics |
Next Steps
- Deploy inventory scripts: Windows Inventory Collection Script or macOS Inventory Collection Script
- Connect Power BI to Log Analytics: If you haven't already, complete the Log Analytics Setup pages to allow Power BI to read data from the workspace.
- Also setting up WUfB Reports? See WUfB Reports. The workspace you created (or selected) above will be shared.